
Changed O Ring Kit and Spout still leaking from the base
If your Kitchen Tap is dripping where the spout meets the base of the tap then usually a new set of O Rings should fix this problem.
Troubleshooting :
I have fitted O Ring Kit and tap is still leaking ?
- This could be due to how the O Ring Kit is fitted, so please check again. Instructions below
- Could you have torn the new kit while fitting it ? check that the new rings themselves look ok.
- It could be that you have a pinhole in your spout and the spout is worn and then no new o ring kit will fit this. You would have to replace the spout itself.
Here is an example of a worn spout that had pinholes. In this case the customer had tried to sets of o rings and still a drip. In our experience it is extremely unlikely to be the o rings themselves as we source these from the manufacturer of your tap (we only supply o rings for brands / models that we can source the exact o rings). We do appreciate that a pinhole can be hard to find.
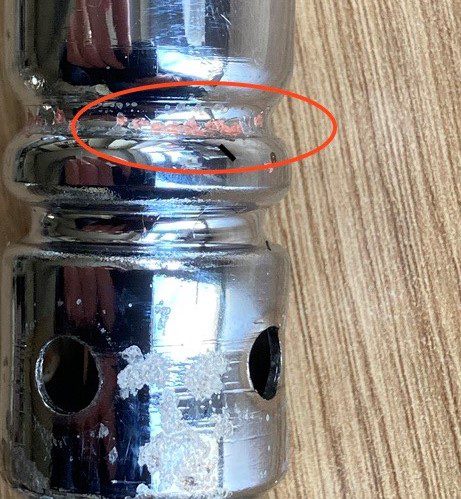
Example Pinhole in Spout
This is what the customer M said who very kindly sent us the picture : ” It occurred to me that it might help you to help customers if you could show them what a ‘pinhole’ in the spout could look like, so I am attaching a picture of mine. As you can see, it doesn’t look like a hole at all, more of a graze on the surface. It was only when I could block the main input holes with gaffer tape and then fill the spout to above where the clip fits that I could be certain that the spout was actually perforated. Until then, I was convinced that the water was coming up past the o-ring. We are in a very hard water area, so I wonder if the scale had ground away at the metal over the five years that we have had the tap.”
Before buying a new spout we would always recommend though that you do all the checks first to make sure that you have fitted the kit correctly, have lubricated it, spout is back secure, and that you also make sure that there is no corrosion in the base of your Tap because no new spout will fix that.
How to fit an O Ring Kit refresher.
We would always recommend that if you are dismantling a tap, it is a good idea if you have a camera on your phone, to take some pictures as you go through each step of the process (take your time) and that way, when it comes to reassembling the tap, you will put it back in the same order. As always, with any advice that we give, it is just to assist and we would recommend that if in doubt, call in a plumber.
Please note that although we supply the complete O Ring Kit including white (plastic) O Rings that the manufacturer puts on your Spout, usually only the black rubber O Rings need to be replaced so you should just replace these first as per below and see if Tap is working fine i.e. don’t replace the white PTF Rings on your own spout unless damaged / broken as they are unlikely to require replacing even though they come with the O Ring Kit that you have purchased from us. If you do need to replace the white plastic O Rings, please ensure that you replace exactly in same position as before. e.g. if there is a gap / split in the White O Ring, this is to allow the grub screw to be screwed back in after and therefore it needs to be put back in the exact same position as was there originally.
If your O Ring Kit has surplus O Rings, don’t worry. Some of our Kits cover more than one Spout from the same manufacturer so just replace like for like.
Tip: Take a picture of your own O Rings on your Spout before removing / replacing , to ensure that you replace like for like.
Guide to Installation of new kitchen tap spout “O” rings (Single Lever Taps are covered further down):
- Turn off the hot & cold water supply under the sink unit.
- Unscrew the spout collar by hand.
- Pull the spout out of the body of the tap. Depending on the age of your spout it might be stuck. You need to be over the sink i.e. standing on something to lift it straight up as distinct from pulling it towards you in any way. We recommend that if you have difficulty removing the Spout after unscrewing grub screw (if there) and undoing ring (shroud / locking nut) if there and it still won’t come out you would be better off calling a plumber to prevent you damaging your Spout.
- Remove the two black “O” rings.
- Fit new “O” rings. We would recommend that you use a lubricant that doesn’t cause rubber to perish if you wish to grease them first e.g Plumbers grease, washing up liquid. Do not use Vaseline, as Vaseline can cause rubber to perish. As sometimes the new rubber o rings can be damaged on installation and the tap will still leak.
- Gently push the spout into the body. Care must be taken when reinserting the spout into the body to ensure that the grub screw is located in the split of the white PTFE ring (where Grub screw is present). Where no Grub Screw present care must be taken to ensure that the black o rings remain in correct position because if they move your tap will continue to leak from this spot.
- Screw the spout collar, hand tight.
- Turn on the hot & cold water.
- If your Spout is still leaking at the base, please check that all rings have been properly fitted into their grooves. Please check also for pin holes in the spout as these can be missed and that could be the reason why your spout is leaking.
PLEASE ALSO SEE OUR BLOG POST : REMOVING A KITCHEN TAP SPOUT
For replacing an O Ring Kit on a single lever Tap:
See above guide if the location of your O Ring Kit is similar to a standard monobloc twin or tri lever tap e.g. straightfoward e.g like in this example here, the O Rings SP3527 are on the base of the Spout and the Cartridge SP1202 is in the body of the Tap.
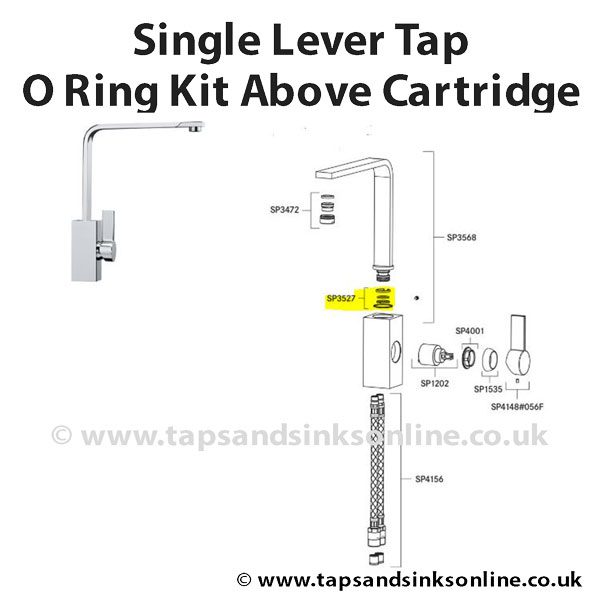
Single Lever Tap O Ring Kit Above Cartridge
It is not as straightforward if the o rings are placed below the cartridge, which makes it harder to access.
Where the O Rings are placed BELOW the cartridge (which is harder than where they are ABOVE the Cartridge) :
You would be best advised to use our ‘how to remove a cartridge guide, and then you would need to unscrew the housing underneath anticlockwise and you are essentially then dismantling the entire tap to get at the o rings
Here is a bluprint of one type of Single Lever Cartridge to illustrate what we mean – In this example below the O Ring Kit is code 1231R and the Cartridge is 1229R and it shows how far down the O Ring Kit is located in the Tap.
This is what the owner of this spout said ‘As you can see, it doesn’t look like a hole at all, more of a graze on the surface. It was only when I could block the main input holes with gaffer tape and then fill the spout to above where the clip fits that I could be certain that the spout was actually perforated. Until then, I was convinced that the water was coming up past the o-ring. We are in a very hard water area, so I wonder if the scale had ground away at the metal over the five years that we have had the tap.’ He purchased a new spout and it sorted the issue.
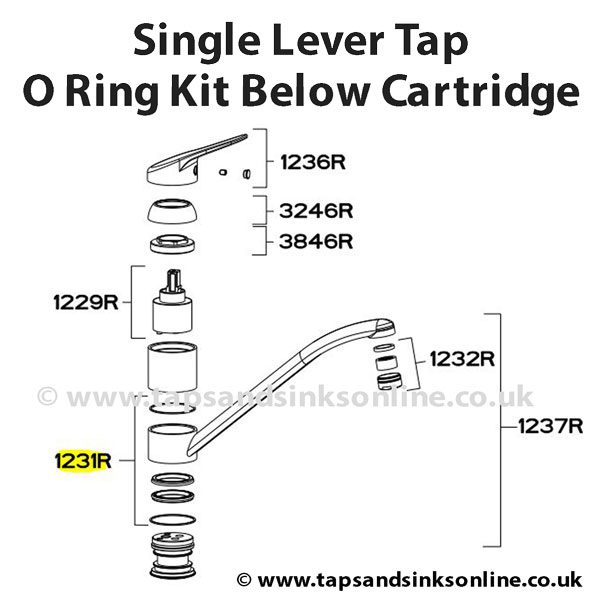
Single Lever Tap O Ring Kit Below Cartridge