Removing limescale

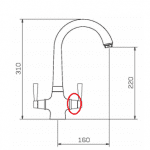
Tap Blueprint showing fixing nut
Removing Limescale tip !
This is a tip that I got recently from a Tap Manufacturer where a customer was trying to replace his Valve.
He had gotten his handle off but couldn’t remove the shroud (also known as locking nut / fixing nut / hood that covered the valve due to the buildup of limescale.
Removing Limescale Tip :
Soak problem area in a solution of lemon and water (equal proportions) for maximum of 30 minutes.
Rinse off solution completely then.
Repeat this process as often as required to remove the limescale – but always only to a maximum of 30 minutes and completely wash off solution in between)
If in doubt as to the finish of your tap, you should test on a tiny bit first where it won’t be seen.

Hi Alice,
We have had correspondence over the last few months re my Franke Sion cartridges. My plumber has tried to remove both cartridges with the hex 14mm box spanner without success. My last resort is to try lemon juice as per your tip for removing limescale as this must be the source of the problem. However is it a suitable method because the juice has to penetrate the threads on the cartridge which are tightly encased in the body of the tap.
Hi Liz the lemon juice is a tip from Perrin and Rowe which some customers have found useful. That is all the information that we have.
A telephone number would deal with quickly
HI John
I have replied to your email that you also sent us when we looked for more information
“I unscrewed the cap off of the end of the mixer tap to clear any debris which may have accumulated however when some black particles were removed I tried to refit the metal cap with the plastic flow restrictor and rubber washer but they will not fit ” and the pictures were useful as it has hopefully helped me assist you. Hence why we conduct spare parts enquiries via email rather than by telephone. We cannot possibly answer questions over the phone as we invariably need pictures of the spare part (if possible) and the actual Tap itself, as most customers, like yourself, do not know the Brand name of the Tap that they have. As they say… a picture is worth a thousand words… I have sent you a link to a Perlator that might fit your Spout. Also the tip that i provided related to removing limescale around a handle. Judging by your email, your aerator disintegrated upon removal i would think, hence why it didnt fit back after (that is if your Aerator was a screw in one to begin with, which is usually the case). Perlata is not the name of your Tap by the way, rather it is the name of the Aerator Brand that is fixed to your Spout. I have also sent you a link of the other Aerators we stock as well so that you can check the end of your own spout for M or F Thread etc. If your Spout does not have a thread at the tip to accomodate the Aerator, then I don’t think that we can help you unfortunately but I am hoping that i have identified the correct one for you. Regards, Alice.
Only 3 parts to this;
The end piece which screws off
The blue insert which governs the flow
A rubber nut
The insert can only fit from the outermost end and nothing will hold the insert in the rubber washer just seems superflous