
Changing the SMR Mini Valve
Mini Valve 3794R and earlier 3308R (this is a change in Valve by your Tap manufacturer’.This post on ‘Changing the SMR Mini Valve’ is laid out in 3 Sections:
1 Section 1 Explains key changes in this mini valve over the years in production & removal tools needed.
2 Section 2 : Why you are replacing a valve in your tap to ensure you have correctly diagnosed the problem.
3 Section 3 : How to remove and replace the valve, and reminder of what tools are needed.
4 Section 4 : Useful Guides and Links
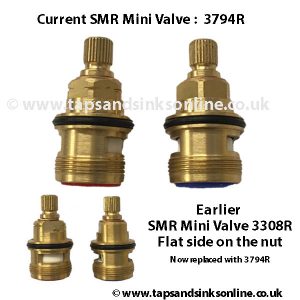
Section 1 The key difference between the earlier 3308R and the later 3794R is
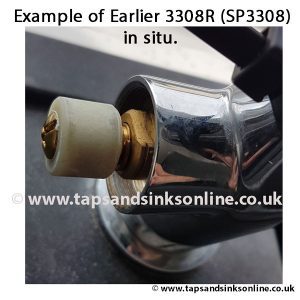
3308R Valve (aka SP3308)
-
- has the white (or black) seal which is a little thicker than later 3794R.
- It is stamped ‘San Marco’ plus date .
- Flat sided nut which can make it harder to remove. You can try a mechanics long socket and ratchet tool to remove the Valve from this Tap, or a 12mm spanner, or buy a special tool from us. Be careful not to force any tool on this valve and thereby damage it so much that you cannot then remove it with the correct fitting tool.

San Marco SMR Mini Valve 3308R , showing flat sides on nut
- We supply a tool 4013R for this purpose which you can order here.
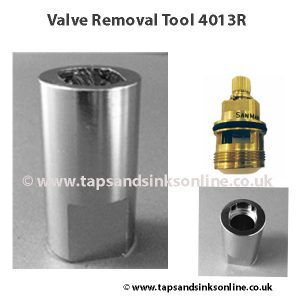
Valve Removal Tool 4013R
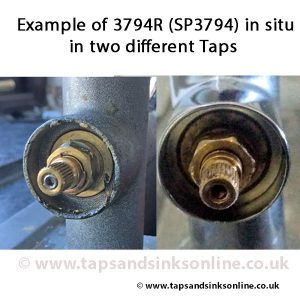
3794R Valve (aka SP3794)
-
- Red / Blue seals
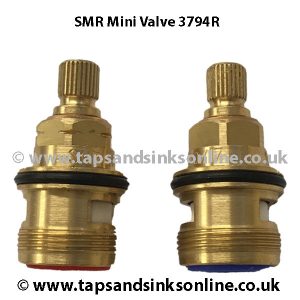
SMR Mini Valve 3794R Pair, 6 Sided Nut
- Stamped SMR plus date
- 6-sided nut so can be extracted using a size 14 hex key or an adjustable spanner.
- Red / Blue seals
For both of these mini valves :
- They are a little smaller than other ceramic disc valves so can be more prone to the negative effects of debris in the water. Its not a valve that we would recommend if you have hard water at all, unless you are treating your limescale. Even then, and it really depends on what treatment for limescale you are using, debris can still get caught up in the ceramic discs and cause them to fail.
- Both valves are interchangeable in your Tap i.e you can replace the 3308R with a 3794R and vice versa. However, for older Taps we would recommend you continue with the 3308R.
- A Hot Valve opens Clockwise. A Cold Valve opens Anti-Clockwise.
- If you do not know which Valve is at fault this Post here should assist you : How to tell which Valve needs replacing – Hot or Cold?
- No Brass Bush is usually required with the mini SMR Valve.
- Both Valves are quarter turn with ceramic discs, also known as Glands. They will have SMR or San Marco stamped on them.
- Measurements: Height 38mm, Diameter at thread: 20mm, Splines: 28
Section 2 If you are replacing your Mini Tap Valve, then this is because :
Your Tap is dripping from either the end of the Spout (Aerator end) or from the Handle. [If dripping from the base of the Spout that is not a Valve issue, but to do with the Spout O Rings or the Spout itself & please contact us if you need help identifiying these parts.] Here is our general Post on ‘My Kitchen Tap is dripping‘ for further explanations on the main reasons why a Kitchen Tap Drips and how to fix.
Section 3 How to remove your Tap Handle & replace the Valve ?
The value in knowing which version of the Valve you have in your Tap before you go to remove it is because if you are ordering the part from us, and require the Removal Tool 4013R Tool to remove the earlier 3308R, you can order this Tool at the same time as the valve to save on shipping costs.
If you have the later 3794R with the six sided nut, then this valve can be removed without needing a special tool. A 14 size Hex Key will remove it which you can buy in any DIY store (or ideally borrow !).
- Remember to turn off the water supply before attempting any repairs and consult a professional if you are unsure about how to proceed.
- We recommend that you place a cloth or towel underneath to catch the screw as they are tiny and you don’t want to lose it. But if you lose it you can of course buy one here.
- You usually need a 2mm allen key (screw is located underneath the handle) But there are a few models, e.g the Franke Bern, that uses a 2.5mm handle grub screw. Please don’t attempt to try to guess the size of your Allen Key because if you damage a grub screw you might not be able to remove it.Click here to buy the allen key 2mm for the Handle and 2.5mm for the grub screw in your spout. Click here for 2mm Allen Key only
- Turn the screw anticlockwise to loosen it.
- There is a usually small white handle insert (separate part) that covers the top of the valve.
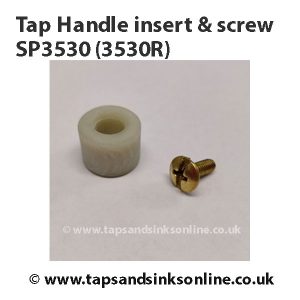
Tap Handle Insert & Screw SP3530 3530R
If your own needs replacing you can purchase that part SP3530 here.
- If you need to replace the Handle, you can buy the Handle from us but we would need details e.g pictures, of your own Tap to identify which Handle you require. All our Handles come complete with Grub screw. Here are the Handles we currently stock. If you can’t find your own Handle there, just contact us for assistance.
- Here is our video showing how to remove a Handle that is fitted with a grub screw.
- You screw out a valve ‘anti-clockwise’. As you loosen the valve some water may start to seep out. Don’t panic. It’s just some water left in the Tap chamber. When the valve has been removed clean this chamber.
- Screw in the new valve, turning clockwise.
- Then repeat the above steps in reverse.
- Tightening your new valve: Don’t over-tighten this valve. As a rule of thumb, tighten as far as physically possible by hand, and then tighten 1/4 turn with an adjustable spanner.
- Finishing with tightening back the grub screw of the Handle.
- Turn back on your water.
Whichever Valve is in your own tap, you will receive the SP3794 if you order here (and this part will also link to any other part referred to above ). If you want the earlier version with the flat sides on the nut, you can click here to order it.
Still need help ?
If in any doubt, having read the links please contact us before buying because we can advise you on the correct part for your Tap. You can email pictures to us sales@tapsandsinksonline.co.uk or use the Contact us Page or click the Contact Button at the right hand corner of your screen.
Section 4 Useful Guides and Links
You can find all the Brands we do Genuine Tap Spares for here , where we list each Brand alphabetically, and in turn, each model is then listed Alphabetically or by Tap Model Code.
O Rings: Tap dripping where the spout meets the base of the Tap? Guide here.
Aerator: Found at the tip of the spout. Here is our Guide How to Remove your Aerator / Antisplash from your Kitchen Tap.
Our general Help Section is here
See our Trouble Shooting Guide here for the most common problems.
After Sales Advice
Our Sales Team is available for excellent after sales service. If you contact us before buying, we will advise you on the correct part for your Tap. That way, if you are calling in a Plumber to fix your Tap, all the correct parts will be there for the Plumber to fix your Tap.
Posted in: Helpful Tips
Leave a Comment (0) ↓